Summary
We just launched our own Jev-like classifier, together/Tev1-4B-experimental, on top of Qwen3.5 4B on Together’s serverless platform. In this blog post we’ll show you how to fine-tune your own version!
Jev has quickly become one of the most talked about model releases in the AI space. It’s a powerful classification model that’s both fast and incredibly cheap to run.
Give Jev a piece of state plus predefined questions and it will quickly give back a result in the form of a score, boolean value, or multiple choice answer.
This sort of classification model has many real-world applications, such as an e-commerce site evaluating automated customer returns, categorizing ML papers, or even providing a sentiment rating for a piece of text.
Today we’re going to fine-tune our own Jev-like classification model that takes state and returns an answer. Our goal is to create a model that can quickly and efficiently answer questions like:
In this blog post we’ll cover how to fine-tune and deploy a classification model that can answer these types of questions. By the time we’re done, you’ll have your own model deployed with an API endpoint that’s easy to integrate into any piece of software.
Let’s get started by setting up your computer with everything needed to train the model.
If you would rather jump straight into using the classifier, and not bother with training your own model, check out together/Tev1-4B-experimental on Together’s serverless platform.
Getting started
The first thing we need to do is clone the tev1 GitHub repository.
Once the repository is cloned, we’ll need to install the necessary dependencies using:
The final setup step is to create an .env file that will hold the necessary environment variables.
Copy .env.example:
Edit the new .env file and add your TOGETHER_API_KEY. You do not need to add a JEV_MODEL just yet. Leave it blank for now.
And that’s it. We’re now ready to fine-tune our model.
Fine-tuning a classification model
The next step is to take an existing language model and turn it into a model that specializes in classification. In order to do that we’ll need to create a fine-tune using a base model and a number of existing datasets.
For the base model we’ll use Qwen3.5 4B and for the datasets we’ll use a handful that are hosted on Hugging Face.
Picking datasets
We’ll sample 38,000 questions from various datasets, each one specializing in a different type of classification.
Here are the datasets and the number of examples we’ll use:
We only use 38,340 examples to keep our fine-tuning costs low. Training against a dataset of this size will only cost about $17.0, while larger datasets are more expensive and time-consuming to train against.
Normalizing the data
Now that we have picked our six data sources, we need to sample a limited number of questions from them as well as normalize these questions so they are all in the same format.
The repository contains a number of Python scripts that automate this process.
First, download the datasets:
Next, sample and normalize the questions that we will use for training:
For these commands you should see some output and no errors.
Now that we have our training datasets, we’re ready to move on to the next step and fine-tune the classification model.
Training the model
We can launch a fine-tuning job using Together AI’s Fine-tuning service.
There is a Python script that will help automate this process. Run it using:
This script takes care of a number of steps needed to train a model. First, it uploads the training data to Together and then it launches a fine-tuning job using the dataset and appropriate parameters.
Once the fine-tuning job launches, the training script will output a training job ID.
You can check on the status of the training using the Together CLI:
You can also check on the status of the training job using the Fine-tuning dashboard over on Together AI.
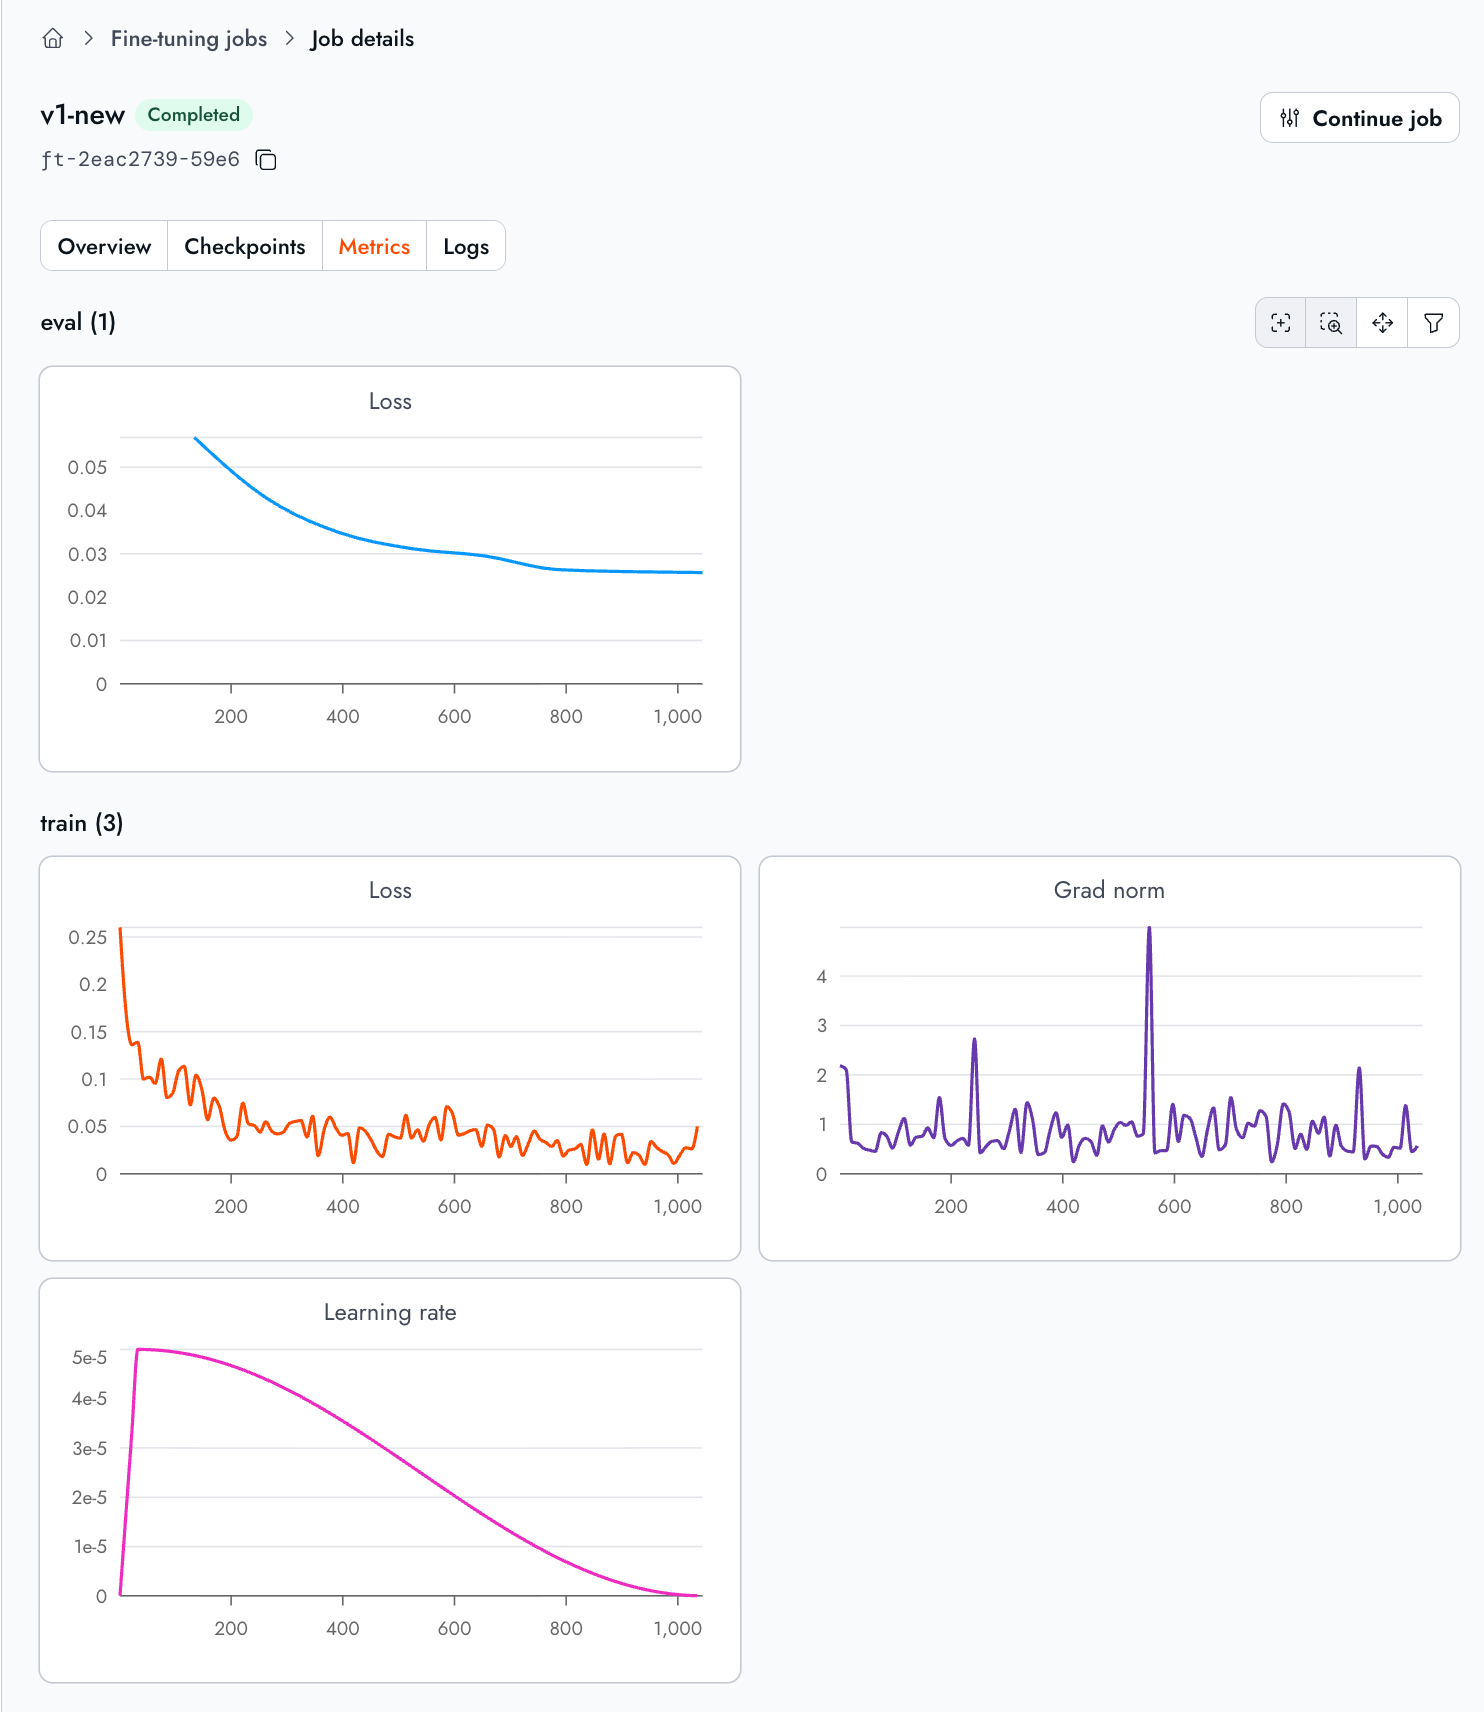
The training job will take roughly 25 minutes to complete, and once it does we’ll have a model that is ready to do classification.
Deploying the model
Before we can deploy our model, we’ll first need its name from the fine-tuning job. Run the following command:
This command will print the model’s model_output_name. We’ll use this name to deploy the model to a dedicated endpoint on Together AI.
Dedicated endpoints are responsible for exposing a fine-tuned model over an HTTP server so that we can send queries to it.
Running this command will return information about your new endpoint:
Once created, you will see the name of the endpoint in the output. You can also find more information about the endpoint using your Dedicated endpoints dashboard over on Together AI as well.
Put the name of the endpoint inside of your .env as JEV_MODEL. For example, if your endpoint were named account_855c/Qwen3.5-4B-jev-efde5bd5-068f756b then your .env should have:
And that’s it. Your model is now deployed on Together AI and ready to answer any classification questions.
In the next section, we’ll learn how to query our model.
Querying the model
The code repository contains a number of test cases to verify the model is functioning correctly. Let’s use our classification model to find the intent of a customer’s question about their subscription:
Customer message: Hi, I checked my statement and your company charged my card twice for the October subscription. The amounts are both $19.99 on the same day. I have not changed my plan.
Since our model was fine-tuned on JSON input and output, we need to format that question, and its possible answers, using a JSON data structure like so:
And we can send this data structure to our model for classification using the following command:
The examples/charge-dispute.json file contains our JSON example from above, and decide.py is a Python script that sends it to our fine-tuned model.
Once we send the request, we’ll quickly see the model respond with:
This is exactly what we wanted to see. Not only is it the correct answer, but it’s also the correct output format that the model learned from our training data.
There are a handful more examples inside of the examples/ folder. These examples include questions related to intent, yes/no comprehension, boolean policy checks, and sentiment analysis. Try changing these and running them against your deployed model.
Note: Our example script supplies the system prompt and inference settings automatically. When calling the API directly or using Chat Playground, explicitly set temperature=0, max_tokens=8, and chat_template_kwargs={"enable_thinking": false}. These defaults are not automatically injected by the current public endpoint.
Use this system prompt:
Wrapping up
After you are done experimenting with your new model, you can turn off your dedicated endpoint using:
To use your model again later, restart the dedicated endpoint or use the Together hosted together/Tev1-4B-experimental version on our serverless platform.
For about $17 in training costs and twenty-five minutes of waiting time, you now have your own fine-tuned classification model, deployed behind an HTTP endpoint, that answers in the format your software expects.

.png)
.png)